;
// Usage on database object
GRANT USAGE ON DATABASE identifier($database_name) TO ROLE SECODA;
// Usage on existing schemas
GRANT USAGE,MONITOR ON ALL SCHEMAS IN DATABASE identifier($database_name) TO ROLE SECODA;
// References for INFORMATION_SCHEMA to existing tables
GRANT SELECT ON ALL TABLES IN DATABASE identifier($database_name) TO ROLE SECODA;
GRANT SELECT ON ALL VIEWS IN DATABASE identifier($database_name) TO ROLE SECODA;
// ====== Future Tables & Schemas
// Read access to all schemas created in the future (but not current ones)
GRANT USAGE,MONITOR ON FUTURE SCHEMAS IN DATABASE identifier($database_name) TO ROLE SECODA;
// Reference for INFORMATION_SCHEMA to all tables created in the future (but not current ones)
GRANT SELECT ON FUTURE TABLES IN DATABASE identifier($database_name) TO ROLE SECODA;
commit;
```
\[Optional] If you are using Snowflake Dynamic Tables, to bring in those tables, you have to grant `MONITOR` permissions to the SECODA role on all of those tables.
```
GRANT MONITOR ON TABLE database.schema.some_dynamic_table TO ROLE SECODA;
```
This step has to be repeated for every single dynamic table that you wish to bring into Secoda.
\[Optional] If you are using Snowflake Snowpies, to bring in those pipes, you have to grant `MONITOR USAGE` permissions to the SECODA role and `MONITOR` permissions on all of those pipes. The stages that the pipes reference must also be granted access privileges.
```
GRANT MONITOR USAGE ON ACCOUNT TO ROLE SECODA;
GRANT MONITOR ON PIPE database.schema.some_pipe TO ROLE SECODA;
GRANT USAGE ON ALL STAGES IN DATABASE identifier($database_name) TO ROLE SECODA;
```
\[Optional] If you are using Snowflake Streamlit, to bring in those apps, you have to grant `MONITOR` permissions to the SECODA role on all of those apps.
```
GRANT USAGE ON ALL STREAMLITS IN DATABASE identifier($database_name) TO ROLE SECODA;
```
### Step 2: Create User for Secoda
```
CREATE USER SECODA_USER
MUST_CHANGE_PASSWORD = FALSE
DEFAULT_ROLE = SECODA
PASSWORD = "my_strong_password"; *-- Do not use this password *
GRANT ROLE SECODA TO USER SECODA_USER;
// This sets the default role, required for metadata extractions
ALTER USER SECODA_USER SET DEFAULT_ROLE=SECODA
```
{% hint style="info" %}
If you would like to enable the [Push to Snowflake](/integrations/push-metadata-to-source.md) feature, the SECODA\_USER must be the owner of the tables, have INSERT privileges on the table, and MODIFY privileges on the schema and database.
{% endhint %}
#### Key-Pair Authentication
If you would like you use key-pair authentication instead of a password you will need to:
[Configure the key-pair in Snowflake](https://docs.snowflake.com/en/user-guide/key-pair-auth). Once the key is created, you can run the following command to connect the key to the `SECODA_USER`.
ALTER USER SECODA_USER SET RSA_PUBLIC_KEY='my_public_key';
### **Step 3: Whitelist Secoda IP Addresses**
If you create a network policy with Snowflake, add the following [Secoda IP addresses](/faq.md#what-are-the-ip-addresses-for-secoda) to the “Allowed IP Addresses” list.
### **Step 4: Connect Snowflake to Secoda**
1. In the Secoda App, select `Add Integration` on the Integrations page. Search for and select “Snowflake”.
2. Add your credentials as follows:
* User - The name of the User created in Step 2.
* Password - The Password set in Step 2.
* Alternatively you can select the key-pair authentication and enter the private key and passphrase created in step 2.
* Account - This is the Account ID of your cluster.
* Warehouse - The Warehouse set in Step 1.
#### **How do I find my Account ID?**
You can find the Account ID in the Snowflake URL. The account ID is usually a substring of the URL, before `snowflakecomputing.com`. **If your Snowflake URL does not contain `snowflakecomputing.com`, see** [**here**](#account-id-is-not-part-of-url) **to determine your Account ID.**
The account ID will likely be the business name, as well as the cloud region, if Snowflake is cloud hosted. See below for some examples.
1. URL: `https://secoda.snowflakecomputing.com`
ACCOUNT ID: `secoda`
2. URL: `https://secoda.us-east-1.snowflakecomputing.com`
ACCOUNT ID: `secoda.us-east-1`
3. URL: `https://secoda.west-europe.azure.snowflakecomputing.com`
ACCOUNT ID: `secoda.west-europe.azure`
### Troubleshooting
#### Account ID is not part of URL
Snowflake has made some recent changes where URLs can be different than the standard format above. In these cases, you can find the correct account id by:
1. Clicking on the account selector in Snowflake
2. Hovering over the specific account you want to connect to\
\ 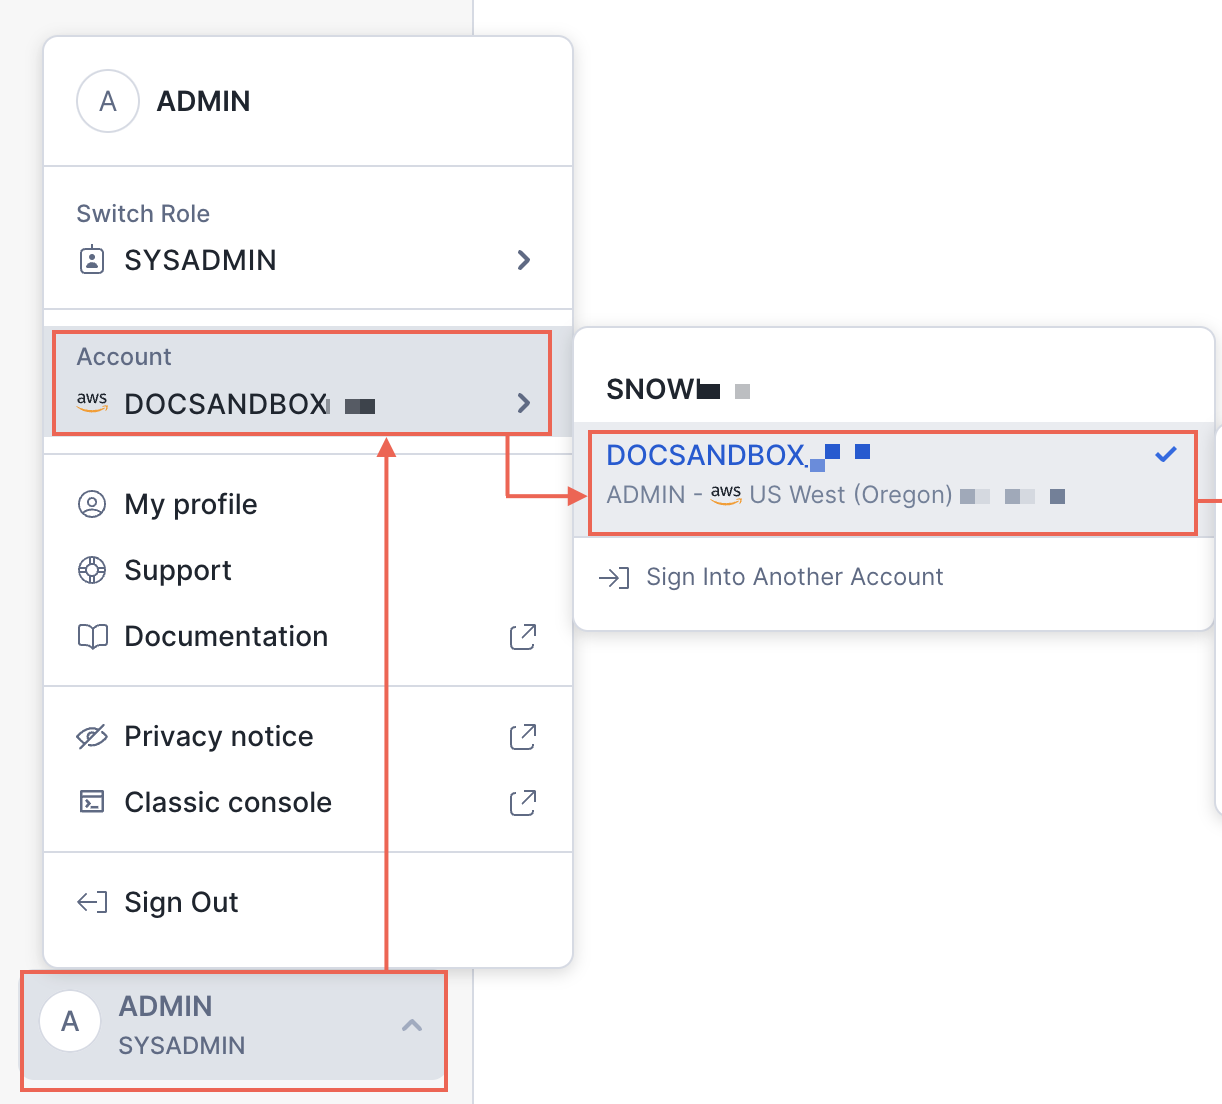 \\
3. Then clicking the copy account URL button on the 3rd section that shows the accounts details (organization id,\
\

This should create a URL ending with `snowflakecomputing.com`and you can follow the steps abvoe to determine the account id.
#### Account usage not authorized
In order to resolve this error, please run the following command:
`GRANT imported privileges on database SNOWFLAKE to ROLE SECODA;`
#### Could not connect to Snowflake backend after 0 attempt(s)
This error could be the result of an incorrect Account ID. Please double check that your Account ID is properly added.
**No active warehouse selected in the current session**
This error can be due to the warehouse name not being fully uppercase. Updating the warehouse name to all uppercase letters should resolve this issue.
#### Missing schemas
Secoda will only show schemas for which tables can be accessed. So most often when a schema is missing, its because the `Secoda` role is lacking permissions to read tables in said schema.
Its possible that since the role was first created, tables were recreated (often by ETL-like tools) and the permissions were reset. To test this, you can run the following query in your Snowflake instance as the `Secoda` role.
```
USE SECONDARY ROLES NONE;
SELECT table_schema, table_name from YOUR_DATABASE.information_schema.tables;
```
This will output a list of all the tables (and corresponding schemas) the Secoda role has access to for a certain database. If some tables are not listed, it means the role is missing the requisite permissions to access them.
Some common reasons for table permissions getting reset are:
* DBT recreating tables without copying permissions. You can use the [copy grants](https://docs.getdbt.com/reference/resource-configs/snowflake-configs#copying-grants) setting to prevent this.
---
# Agent Instructions
This documentation is published with GitBook. GitBook is the documentation platform designed so that both humans and AI agents can read, navigate, and reason over technical content effectively. Learn more at gitbook.com.
## Querying This Documentation
If you need additional information that is not directly available in this page, you can query the documentation dynamically by asking a question.
Perform an HTTP GET request on the current page URL with the `ask` query parameter, and the optional `goal` query parameter:
```
GET https://docs.secoda.co/integrations/data-warehouses/snowflake-integration.md?ask=&goal=
```
`ask` is the immediate question: it should be specific, self-contained, and written in natural language.
`goal` is optional and describes the broader end goal you are ultimately trying to accomplish on behalf of the user. GitBook uses it to tailor the answer towards what is most useful for that goal.
The response will contain a direct answer to the question and relevant excerpts and sources from the documentation.
Use this mechanism when the answer is not explicitly present in the current page, you need clarification or additional context, or you want to retrieve related documentation sections.
\\
3. Then clicking the copy account URL button on the 3rd section that shows the accounts details (organization id,\
\

This should create a URL ending with `snowflakecomputing.com`and you can follow the steps abvoe to determine the account id.
#### Account usage not authorized
In order to resolve this error, please run the following command:
`GRANT imported privileges on database SNOWFLAKE to ROLE SECODA;`
#### Could not connect to Snowflake backend after 0 attempt(s)
This error could be the result of an incorrect Account ID. Please double check that your Account ID is properly added.
**No active warehouse selected in the current session**
This error can be due to the warehouse name not being fully uppercase. Updating the warehouse name to all uppercase letters should resolve this issue.
#### Missing schemas
Secoda will only show schemas for which tables can be accessed. So most often when a schema is missing, its because the `Secoda` role is lacking permissions to read tables in said schema.
Its possible that since the role was first created, tables were recreated (often by ETL-like tools) and the permissions were reset. To test this, you can run the following query in your Snowflake instance as the `Secoda` role.
```
USE SECONDARY ROLES NONE;
SELECT table_schema, table_name from YOUR_DATABASE.information_schema.tables;
```
This will output a list of all the tables (and corresponding schemas) the Secoda role has access to for a certain database. If some tables are not listed, it means the role is missing the requisite permissions to access them.
Some common reasons for table permissions getting reset are:
* DBT recreating tables without copying permissions. You can use the [copy grants](https://docs.getdbt.com/reference/resource-configs/snowflake-configs#copying-grants) setting to prevent this.
---
# Agent Instructions
This documentation is published with GitBook. GitBook is the documentation platform designed so that both humans and AI agents can read, navigate, and reason over technical content effectively. Learn more at gitbook.com.
## Querying This Documentation
If you need additional information that is not directly available in this page, you can query the documentation dynamically by asking a question.
Perform an HTTP GET request on the current page URL with the `ask` query parameter, and the optional `goal` query parameter:
```
GET https://docs.secoda.co/integrations/data-warehouses/snowflake-integration.md?ask=&goal=
```
`ask` is the immediate question: it should be specific, self-contained, and written in natural language.
`goal` is optional and describes the broader end goal you are ultimately trying to accomplish on behalf of the user. GitBook uses it to tailor the answer towards what is most useful for that goal.
The response will contain a direct answer to the question and relevant excerpts and sources from the documentation.
Use this mechanism when the answer is not explicitly present in the current page, you need clarification or additional context, or you want to retrieve related documentation sections.