Secoda Docs
Get Started
  • Getting Started with Secoda
    • Secoda as an Admin
      • Deployment options
      • Sign in options
      • Settings
      • Connect your data
        • Define Service Accounts
        • Choose which schemas to extract
      • Customize the workspace
      • Populate Questions with FAQs
      • Invite your teammates
        • Joining & Navigating between Multiple Workspaces
      • Onboard new users
        • Onboarding email templates
        • Onboarding Homepage template
        • Training session guide
      • User engagement and adoption
        • Tips & Tricks to share with new users
    • Secoda as an Editor
    • Secoda as a Viewer
      • Introduction guide
      • Requesting changes in Secoda
  • Best practices
    • Setting up your workspace
    • Integrating Secoda into existing workflows
    • Documentation best practices
    • Glossary best practices
    • Data governance
    • Data quality
    • Clean up your data
    • Tool migrations using Secoda
    • Slack <> Questions workflow
    • Defining resources workflow
    • Streamline data access: Private and public teams workflow
    • Exposing Secoda to external clients
  • Resource Management
    • Editing Properties
      • AI Description Editor
      • Bulk Editing
      • Propagation
      • Templates
    • Resource Sidesheet
    • Assigning Owners
    • Custom Properties
    • Tags
      • Custom Tags
      • PII Identifier
      • Verified Identifier
    • Import and Export Resources
    • Related Resources
  • User Management
    • Roles
    • Teams
    • Groups
  • Integrations
    • Integration Settings
    • Data Warehouses
      • BigQuery
        • BigQuery Metadata Extracted
      • Databricks
        • Databricks Metadata Extracted
      • Redshift
        • Redshift Metadata Extracted
      • Snowflake
        • Snowflake Metadata Extracted
        • Snowflake Costs
        • Snowflake Native App
      • Apache Hive
        • Apache Hive Metadata Extracted
      • Azure Synapse
        • Azure Synapse Metadata Extracted
      • MotherDuck
        • MotherDuck Metadata Extracted
      • ClickHouse
        • ClickHouse Metadata Extracted
    • Databases
      • Druid
        • Druid Metadata Extracted
      • MySQL
        • MySQL Metadata Extracted
      • Microsoft SQL Server
        • Page
        • Microsoft SQL Server Metadata Extracted
      • Oracle
        • Oracle Metadata Extracted
      • Salesforce
        • Salesforce Metadata Extracted
      • Postgres
        • Postgres Metadata Extracted
      • MongoDB
        • MongoDB Metadata Extracted
      • Azure Cosmos DB
        • Azure Cosmos DB Metadata Extracted
      • SingleStore
        • SingleStore Metadata Extracted
      • DynamoDB
        • DynamoDB Metadata Extracted
    • Data Visualization Tools
      • Amplitude
        • Amplitude Metadata Extracted
      • Looker
        • Looker Metadata Extracted
      • Looker Studio
        • Looker Studio Metadata Extracted
      • Metabase
        • Metabase Metadata Extracted
      • Mixpanel
        • Mixpanel Metadata Extracted
      • Mode
        • Mode Metadata Extracted
      • Power BI
        • Power BI Metadata Extracted
      • QuickSight
        • QuickSight Metadata Extracted
      • Retool
        • Retool Metadata Extracted
      • Redash
        • Redash Metadata Extracted
      • Sigma
        • Sigma Metadata Extracted
      • Tableau
        • Tableau Metadata Extracted
      • ThoughtSpot
        • ThoughtSpot Metadata Extracted
      • Cluvio
        • Cluvio Metadata Extracted
      • Hashboard
        • Hashboard Metadata Extracted
      • Lightdash
        • Lightdash Metadata Extracted
      • Preset
        • Preset Metadata Extracted
      • Superset
        • Superset Metadata Extracted
      • SQL Server Reporting Services
        • SQL Server Reporting Services Metadata Extracted
      • Hex
        • Hex Metadata Extracted
      • Omni
        • Omni Metadata Extracted
    • Data Pipeline Tools
      • Census
        • Census Metadata Extracted
      • Stitch
        • Stitch Metadata Extracted
      • Airflow
        • Airflow Metadata Extracted
      • Dagster
        • Dagster Metadata Extracted
      • Fivetran
        • Fivetran Metadata Extracted
      • Glue
        • Glue Metadata Extracted
      • Hightouch
        • Hightouch Metadata Extracted
      • Apache Kafka
        • Apache Kafka Metadata Extracted
      • Confluent Cloud
        • Confluent Cloud Metadata Extracted
      • Polytomic
        • Polytomic Metadata Extracted
      • Matillion
        • Matillion Metadata Extracted
      • Airbyte
        • Airbyte Extracted Metadata
      • Informatica
        • Informatica Metadata Extracted
      • Azure Data Factory
        • Azure Data Factory Metadata Extracted
    • Data Transformation Tools
      • dbt
        • dbt Cloud
          • dbt Cloud Metadata Extracted
        • dbt Core
          • dbt Core Metadata Extracted
      • Coalesce
        • Coalesce Metadata Extracted
    • Data Quality Tools
      • Cyera
      • Dataplex
        • Dataplex Metadata Extracted
      • Great Expectations
        • Great Expectations Metadata Extracted
      • Monte Carlo
        • Monte Carlo Metadata Extracted
    • Data Lakes
      • Google Cloud Storage
        • GCS Metadata Extracted
      • AWS S3
        • S3 Metadata Extracted
    • Query Engines
      • Trino
        • Trino Metadata Extracted
    • Custom Integrations
      • File Upload
        • CSV File Format
        • JSONL File Format
        • Maintain your Resources
      • Marketplace
        • Secoda SDK
        • Upload and Connect your Marketplace Integration
        • Publish the Integration
        • Example Integrations
      • Secoda Fields Explained
    • Security
      • Connecting via Reverse SSH Tunnel
      • Connecting via SSH Tunnel
      • Connecting via VPC Peering
      • Connecting via AWS Cross Account Role
      • Connecting via AWS PrivateLink
        • Snowflake via AWS PrivateLink
        • AWS Service via AWS PrivateLink
      • Recommendations to Improve SSH Tunnel Concurrency on SSH Bastion
    • Push Metadata to Source
  • Extensions
    • Chrome
    • Confluence
      • Confluence Metadata Extracted
      • Confluence best practices
    • Git
    • GitHub
    • Jira
      • Jira Metadata Extracted
    • Linear
    • Microsoft Teams
    • PagerDuty
    • Slack
      • Slack user guide
  • Features
    • Access Requests
    • Activity Log
    • Analytics
    • Announcements
    • Audit Log
    • Automations
      • Automations Use Cases
    • Archive
    • Bookmarks
    • Catalog
    • Collections
    • Column Profiling
    • Data Previews
    • Data Quality Score
    • Documents
      • Comments
      • Embeddings
    • Filters
    • Glossary
    • Homepage
    • Inbox
    • Lineage
      • Manual Lineage
    • Metrics
    • Monitors
      • Monitoring Use Cases
    • Notifications
    • Policies
    • Popularity
    • Publishing
    • Queries
      • Query Blocks
        • Chart Blocks
      • Extracted Queries
    • Questions
    • Search
    • Secoda AI
      • Secoda AI User Guide
      • Secoda AI Use Cases
      • Secoda AI Security FAQs
      • Prompts
    • Sharing
    • Views
  • Enterprise
    • SAML
      • Okta SAML
      • OneLogin SAML
      • Microsoft Azure AD SAML
      • Google SAML
      • SCIM
      • SAML Attributes
    • Self-Hosted
      • Additional Resources
        • Additional Environment Variables
          • PowerBI OAuth Application (on-premise)
          • Google OAuth Application (on-premise)
          • Github Application (on-premise)
          • OpenAI API Key Creation (on-premise)
          • AWS Bucket with Access Keys (on-premise)
        • TLS/SSL (Docker compose)
        • Automatic Updates (Docker compose)
        • Backups (Docker compose)
        • Outbound Connections
      • Self-Hosted Changelog
    • SIEM
      • Google Chronicle
  • API
    • Get Started
    • Authentication
    • Example Workflows
    • API Reference
      • Getting Started
      • Helpful Information
      • Audit Logs
      • Charts
      • Collections
      • Columns
      • Custom Properties
      • Dashboards
      • Databases
      • Documents
      • Events
      • Groups
      • Integrations
      • Lineage
      • Monitors
      • Resources
      • Schemas
      • Tables
      • Tags
      • Teams
      • Users
      • Questions
      • Queries
  • FAQ
  • Policies
    • Terms of Use
    • Secoda AI Terms
    • Master Subscription Agreement
    • Privacy Policy
    • Security Policy
    • Accessibility Statement
    • Data Processing Agreement
    • Subprocessors
    • Service Level Agreement
    • Bug Bounty Program
  • System Status
  • Changelog
Powered by GitBook
On this page
  • Getting Started with SSH Tunnels
  • Set Up
  • Connecting your Integration using a Tunnel
  • Troubleshooting

Was this helpful?

  1. Integrations
  2. Security

Connecting via SSH Tunnel

This page walks through connecting your data sources via a direct SSH tunnel

Last updated 4 months ago

Was this helpful?

Getting Started with SSH Tunnels

Tunnels require you to run an SSH server process () on a host accessible from the public internet. These hosts are often referred to as jump hosts or Bastion hosts and can be set up in nearly all cloud providers. The sole purpose of these host is to provide access to resources in a private network from an external network like the internet.

Set Up

There are three main steps to set up a tunnel:

Set up can vary depending on the Cloud provider used. We provide some general tips and tricks for AWS and Azure below.

  1. Configure a host in your environment that is accessible from the public internet. Make sure the is whitelisted.

  2. and add in the configuration details from the host (SSH Username, SSH Hostname, Port). Once you submit these details, a Public Key will be shown.

  3. Add the Public Key to the authorized_keys file in your host.

AWS

  • Create an EC2 instance from the AWS Management Console in a public subnet in the same VPC as the resource that you'd like to integrate with Secoda.

  • Add the SSH key from Secoda.

  • Create a Security Group for this instance, and add an inbound rule for the Secoda IPs.

  • Make sure the EC2 instance has access to the resource that you'd like to integrate with Secoda. This might mean adding an inbound rule for the IP of the EC2 instance to the database or source that you're integrating with Secoda.

Azure Cloud

  • Create a Virtual Network from the Azure console, that has access to the database or datasource that you'd like to integrate with Secoda. Make sure the Azure firewall is enabled for this network.

  • Create a Virtual Machine. This machine is acting as the jump server. This VM does not need an public access, but must have access to the database or datastore that is meant to integrate with Secoda.

  • Go to your firewall rules, and add a NAT rule.

    • Protocol should be set to TCP

    • Source IP address should be set to the

    • Destination IP address should be the IP address of your Firewall

    • Default Port is 22

    • Translated IP address should be the IP address of the Virtual Machine

  • From within your instance, you'll need to create a user and set up the SSH key provided by Secoda. The follow commands are recommended to do this:

# Create a new non-admin user for Secoda
$ sudo useradd -m secoda 

# Switch to the new user
$ sudo su - secoda 

# Create an SSH folder if one doesn't already exist
$ mkdir -p ~/.ssh 

# Set restrictive permissions on the .ssh folder
$ chmod 0700 ~/.ssh 

# Navigate into the .ssh folder
$ cd ~/.ssh 

# Create or open the authorized_keys file, add a Public Key to this file, and save it
$ vi authorized_keys 

# Set restrictive permissions on the authorized_keys file
$ chmod 0600 authorized_keys

# Exit the 'secoda' user session
$ exit

# Restart the SSH service (systemd-based systems)
$ sudo systemctl restart ssh 

# Restart the SSH service (SysVinit-based systems, if applicable)
$ sudo service ssh restart

Connecting your Integration using a Tunnel

Once your tunnel has been made, navigate to the source that you're integrating with. On the connect page, add the credentials for the datasource.

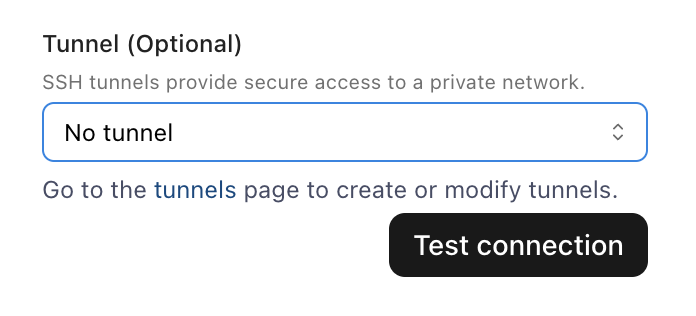
At the bottom of the connect page, you'll see the option to add a tunnel. Click on the arrow to see a drop down menu with your recently created Tunnel. Select this tunnel, and click Test Connection to complete your integration setup!
Troubleshooting

If you're having trouble establishing a connection with a standard tunnel, check the following:

  1. Whitelist the Secoda IP Ensure that the Secoda IP is whitelisted on your Bastion host.

  2. Verify the Public Key Confirm that the public key provided during tunnel creation is correctly added to the ~/.ssh/authorized_keys file of the user on the Bastion host.

  3. Check Permissions on SSH Files Ensure that the permissions on SSH-related files and directories are set correctly:

    • ~/.ssh directory: 0700

    • ~/.ssh/authorized_keys file: 0600

    Note: The permissions for authorized_keys should be 0600 (not 0644) to maintain strict security compliance.

  4. Test Network Connectivity Verify that the Bastion host can connect to your data source. Replace $data_source_host and $data_source_port with the actual hostname and port of your data source.

    Copy code
    nc -z $data_source_host $data_source_port
  • Check that you can use the bastion host from your personal machine. You will need to use your own private and public keys, not the public key from the above step. Replace the values where appropriate.

    ssh -L localhost:1111:<POSTGRES_URL_OR_IP>:5432 -i <PRIVATE_KEY_NAME>.pem <BASTION_USER>@<BASTION_IP> psql -h localhost -P 1111 -U secodapostgres
SSHD
Create a Tunnel in Secoda
Secoda IP address
Secoda IP Address