Secoda AI
This page will go over the Secoda AI functionality.
"LLM provider" refers to OpenAI, Google, or Anthropic.
Overview
The Secoda Secoda AI enhances your data stack by providing a powerful chat interface that allows anyone in your organization to retrieve data insights.
Secoda AI is powered by a combination of models, including OpenAI’s GPT-4o, Google’s Gemini 2.5 Flash and Lite, and Anthropic’s Claude Sonnet 4 and Opus 4. Read more about Secoda AI's security posture in our Security FAQs.
Secoda's AI can help you with documentation, query building, institutional knowledge discovery.
Enabling Secoda AI
By default, Secoda AI is disabled. To activate it:
Navigate to Settings > AI.
Toggle on the Secoda AI.
Once enabled, the Secoda AI will appear in the left-hand menu of your workspace.

Charting
Secoda AI Charting enables users to create data visualizations through natural language prompts, making data insights accessible without requiring SQL or charting expertise.
Secoda AI Charting allows users to describe the charts they want in plain English (e.g., "Show monthly revenue trends"). The system analyzes your data to suggest appropriate visualization types and provides contextual explanations of insights.Users can refine visualizations through conversational follow-ups to adjust chart types, add trendlines, or change grouping parameters.
Simply navigate to the Secoda AI interface, ask a question involving data visualization, and request a chart based on SQL results. The feature integrates seamlessly with the SQL query functionality, allowing you to save both queries and their visualizations.For best results, be specific about metrics, dimensions, and time periods in your requests. The AI will guide you through creating the most effective visualization for your data story.
AI Suggestions
Secoda AI Suggestions enable users to generate glossary terms, documentation, and SQL monitors through natural language prompts—helping teams scale data governance and monitoring with minimal manual effort.
By describing what you need in plain English (ex., “Suggest glossary terms for this dataset” or “Create a monitor for null spikes in this column”), Secoda AI analyzes your workspace metadata, table context, and naming conventions to provide intelligent, contextual recommendations. These suggestions are tailored to your environment and designed to align with existing documentation and monitoring patterns.
To get started, open the Secoda AI and ask for suggestions based on a specific dataset, table, or column. Whether you're building out a glossary or improving observability, the AI helps reduce the lift while ensuring your documentation and alerts stay consistent and complete.
For best results, be specific about which resource you want help with, and what kind of suggestion you’re looking for. Secoda AI will do the heavy lifting to get you there faster.
Secoda AI Context
Secoda AI can answer complex operational and governance questions by leveraging deep metadata awareness across your workspace. In addition to understanding data assets and documentation, Secoda AI draws from monitors, query history, dashboards, policies, automations, and tests to provide more complete, actionable insights.
Users can ask questions like “Which critical tables lack monitors?”, “What are our most expensive queries?”, or “Who’s accessed sensitive data recently?” - and receive tailored answers that reflect real usage patterns, lineage relationships, and configuration details within their environment.
AI Context dynamically interprets and retrieves relevant metadata - including incidents, query logs, calculated fields, policy coverage, and test results - based on the focus of your question. This allows users to quickly uncover blind spots, track compliance, assess performance, or optimize workflows through natural language interaction.
To ask questions given the context of your workspace, simply engage with the Secoda AI Assistant and ask about operational risks, governance gaps, or system behaviour. Secoda AI will synthesize metadata across your stack and return precise, context-aware answers that help your team act faster and with greater confidence.
AI Settings
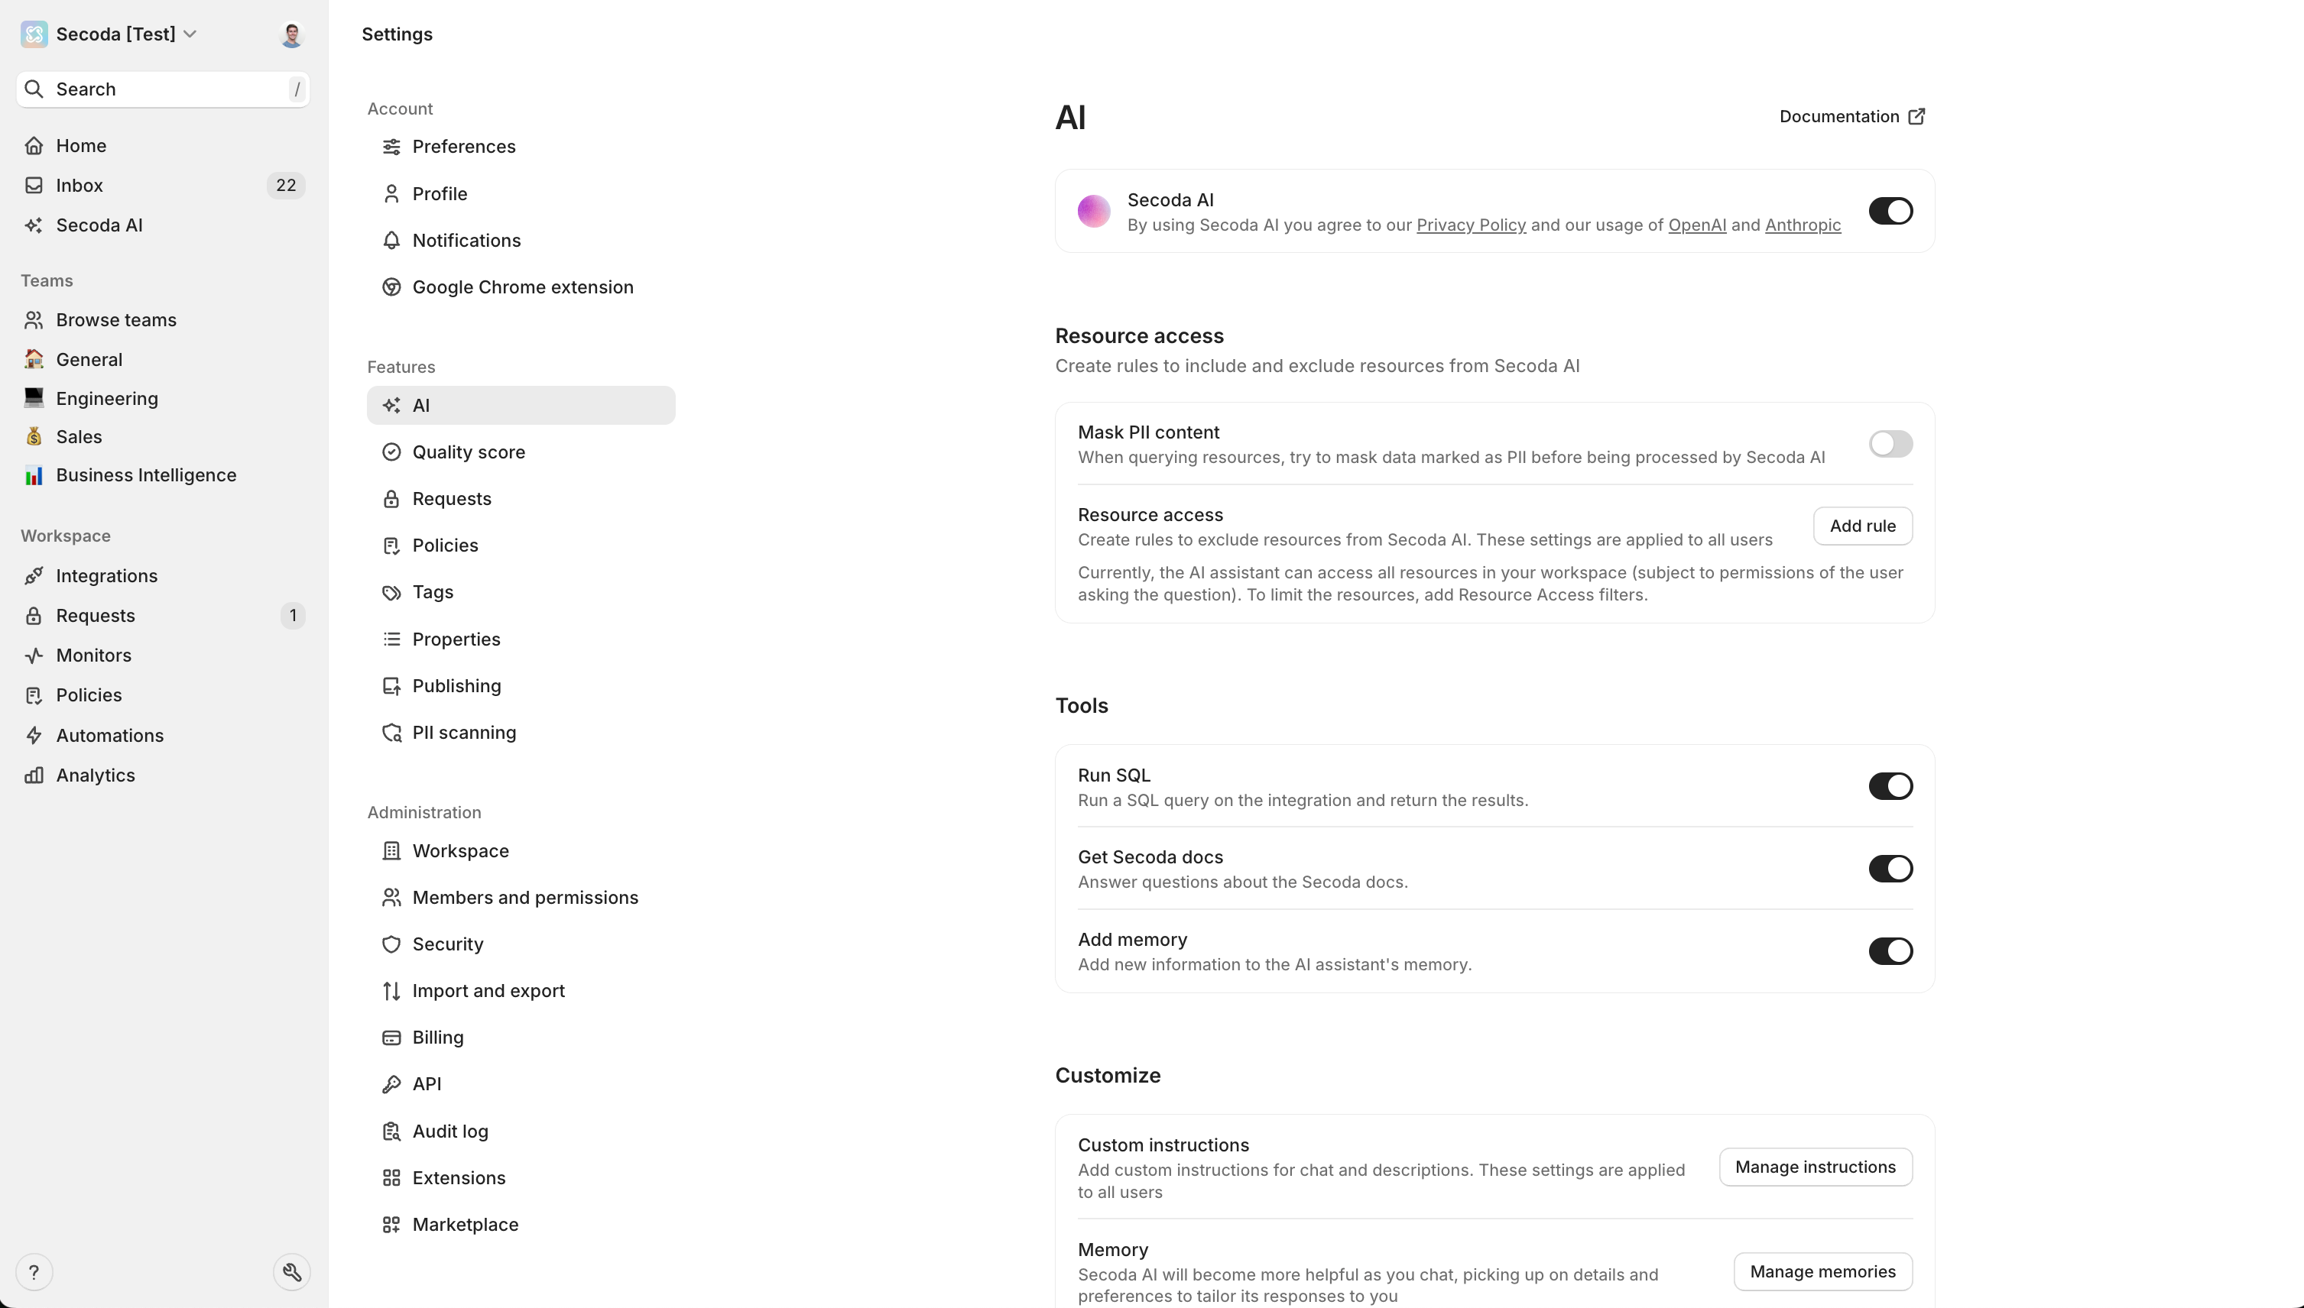
Admins can customize AI settings to align with workspace preferences and security protocols:
Governance
AI Governance in Secoda empowers organizations to control the data accessed by AI, enhancing security and data relevance.
Key Features:
Customizable Filters: Admins can specify which resources are accessible to the AI by setting inclusive or exclusive filter rules. This ensures that AI interactions are confined to appropriate datasets.
Consistent Configuration: The filter rules for AI are aligned with those used on the Search and Catalog pages, ensuring a unified approach to data governance across the platform.
Benefits:
Enhanced Data Security: Restricts AI access to sensitive or non-production data, minimizing potential exposure.
Improved Data Relevance: Focuses AI interactions on current and verified data, increasing the accuracy and reliability of the insights provided.
By implementing these rules, Admins can tailor AI capabilities to fit organizational needs and compliance requirements, ensuring that only relevant and secure data is queried.
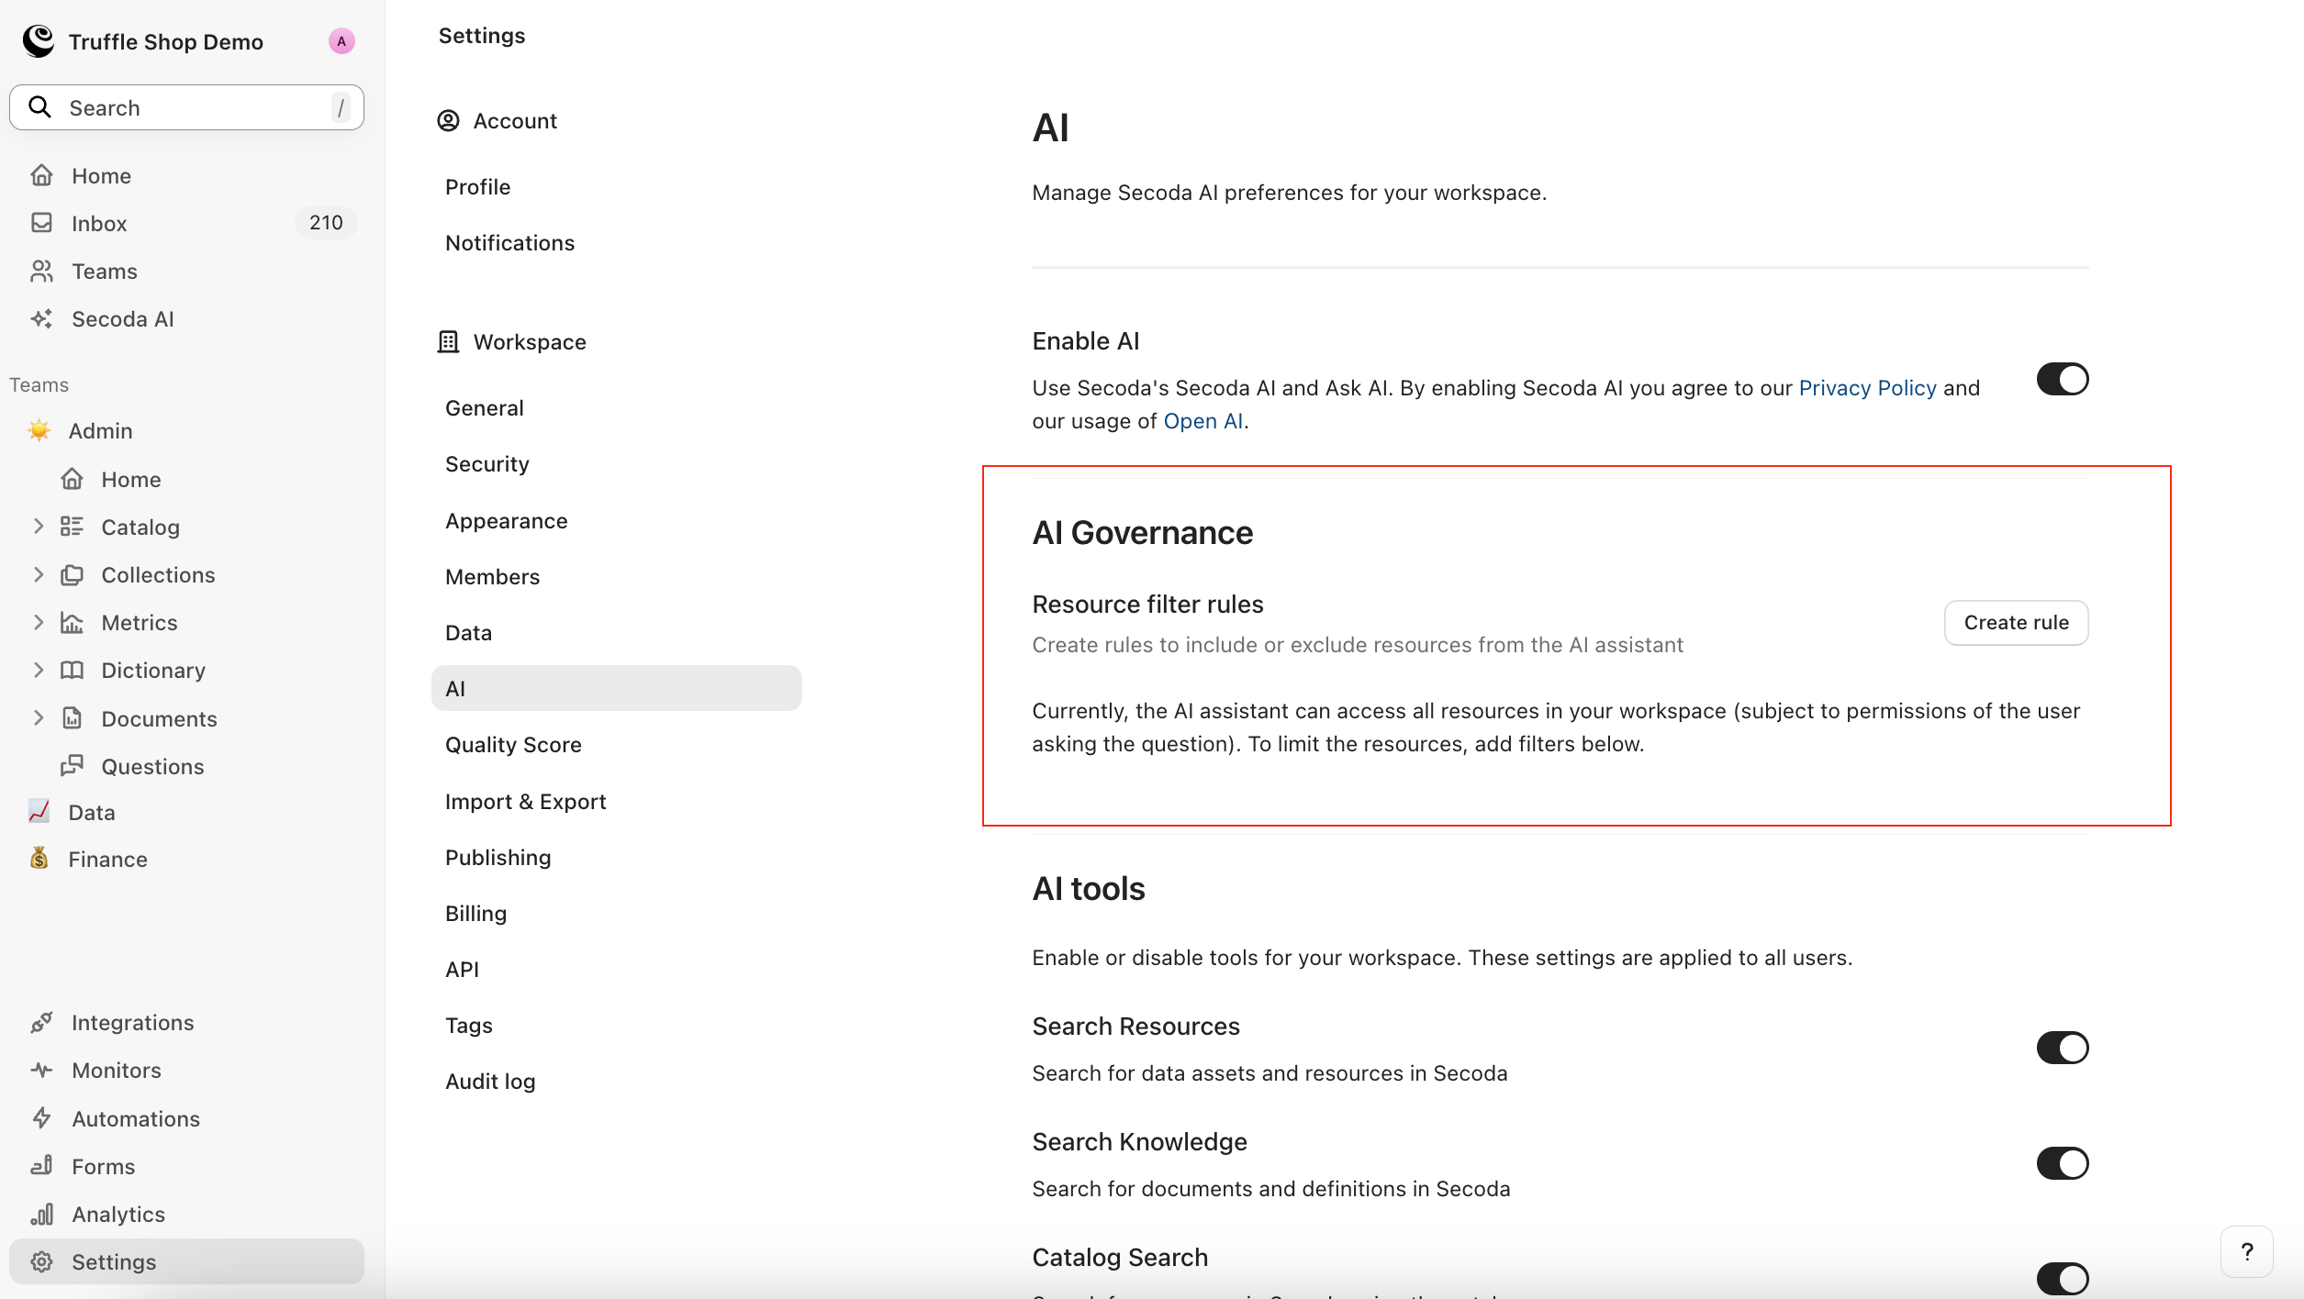
Tools
Run SQL: Executes SQL queries within Secoda to support doing analysis.
Add memory: Saves personal preferences for an individual user, for example, language preference.
Get Secoda docs: Searches https://docs.secoda.co for any product related questions.
To ensure security and relevance:
Team-Based Replies: Our AI strictly adheres to Team-based data access permissions. If a user asks about resources from a Team that they are not a part of, the AI will not return any results.
Query Execution Requirements: The AI will only execute a query if both of the following conditions are met:
run_sqlis toggled on in the AI settings.The user asking the question has Query access for the specific integration, which can be managed by admins in the Integration Permissions settings.
This ensures that only authorized users can run queries on sensitive or critical data, maintaining control over data access.
Custom Instructions
Chat
Admins can set specific instructions for the AI to follow, enhancing control and relevance.
Some examples that we've seen work well:
Do not index on resources tagged with "archived" or "deprecated" or "stale".
Only provide results on "Verified" resources.
Only provide results on Published resources - do not include resources that are still in Draft.
Only reference tables and views from the production analytics schema in Snowflake, never use data from the RAW database.
By default, both Published and Draft resources are included in Secoda AI responses. This can be controlled using the custom instructions to restrict this to only Published resources, for example.
Descriptions
Admins are able to define custom instructions to the AI description editor so that you can define documentation standards and a format for it to follow.
Some examples that we've seen work well:
Add "AI-Generated" to the end of each description added, to indicate to users that a human didn't come up with this definition.
Do not reference the database, schema, table information in the description (this information is obvious in Secoda)
Do not use full, wordy sentences. Be brief and include only the necessary facts.
Descriptions should be concise and not editorialized. Do not describe the data as 'essential' or 'critical'; only describe the contents.
All tables and columns are related to insurance. Keep this in mind when generating descriptions.
Personas
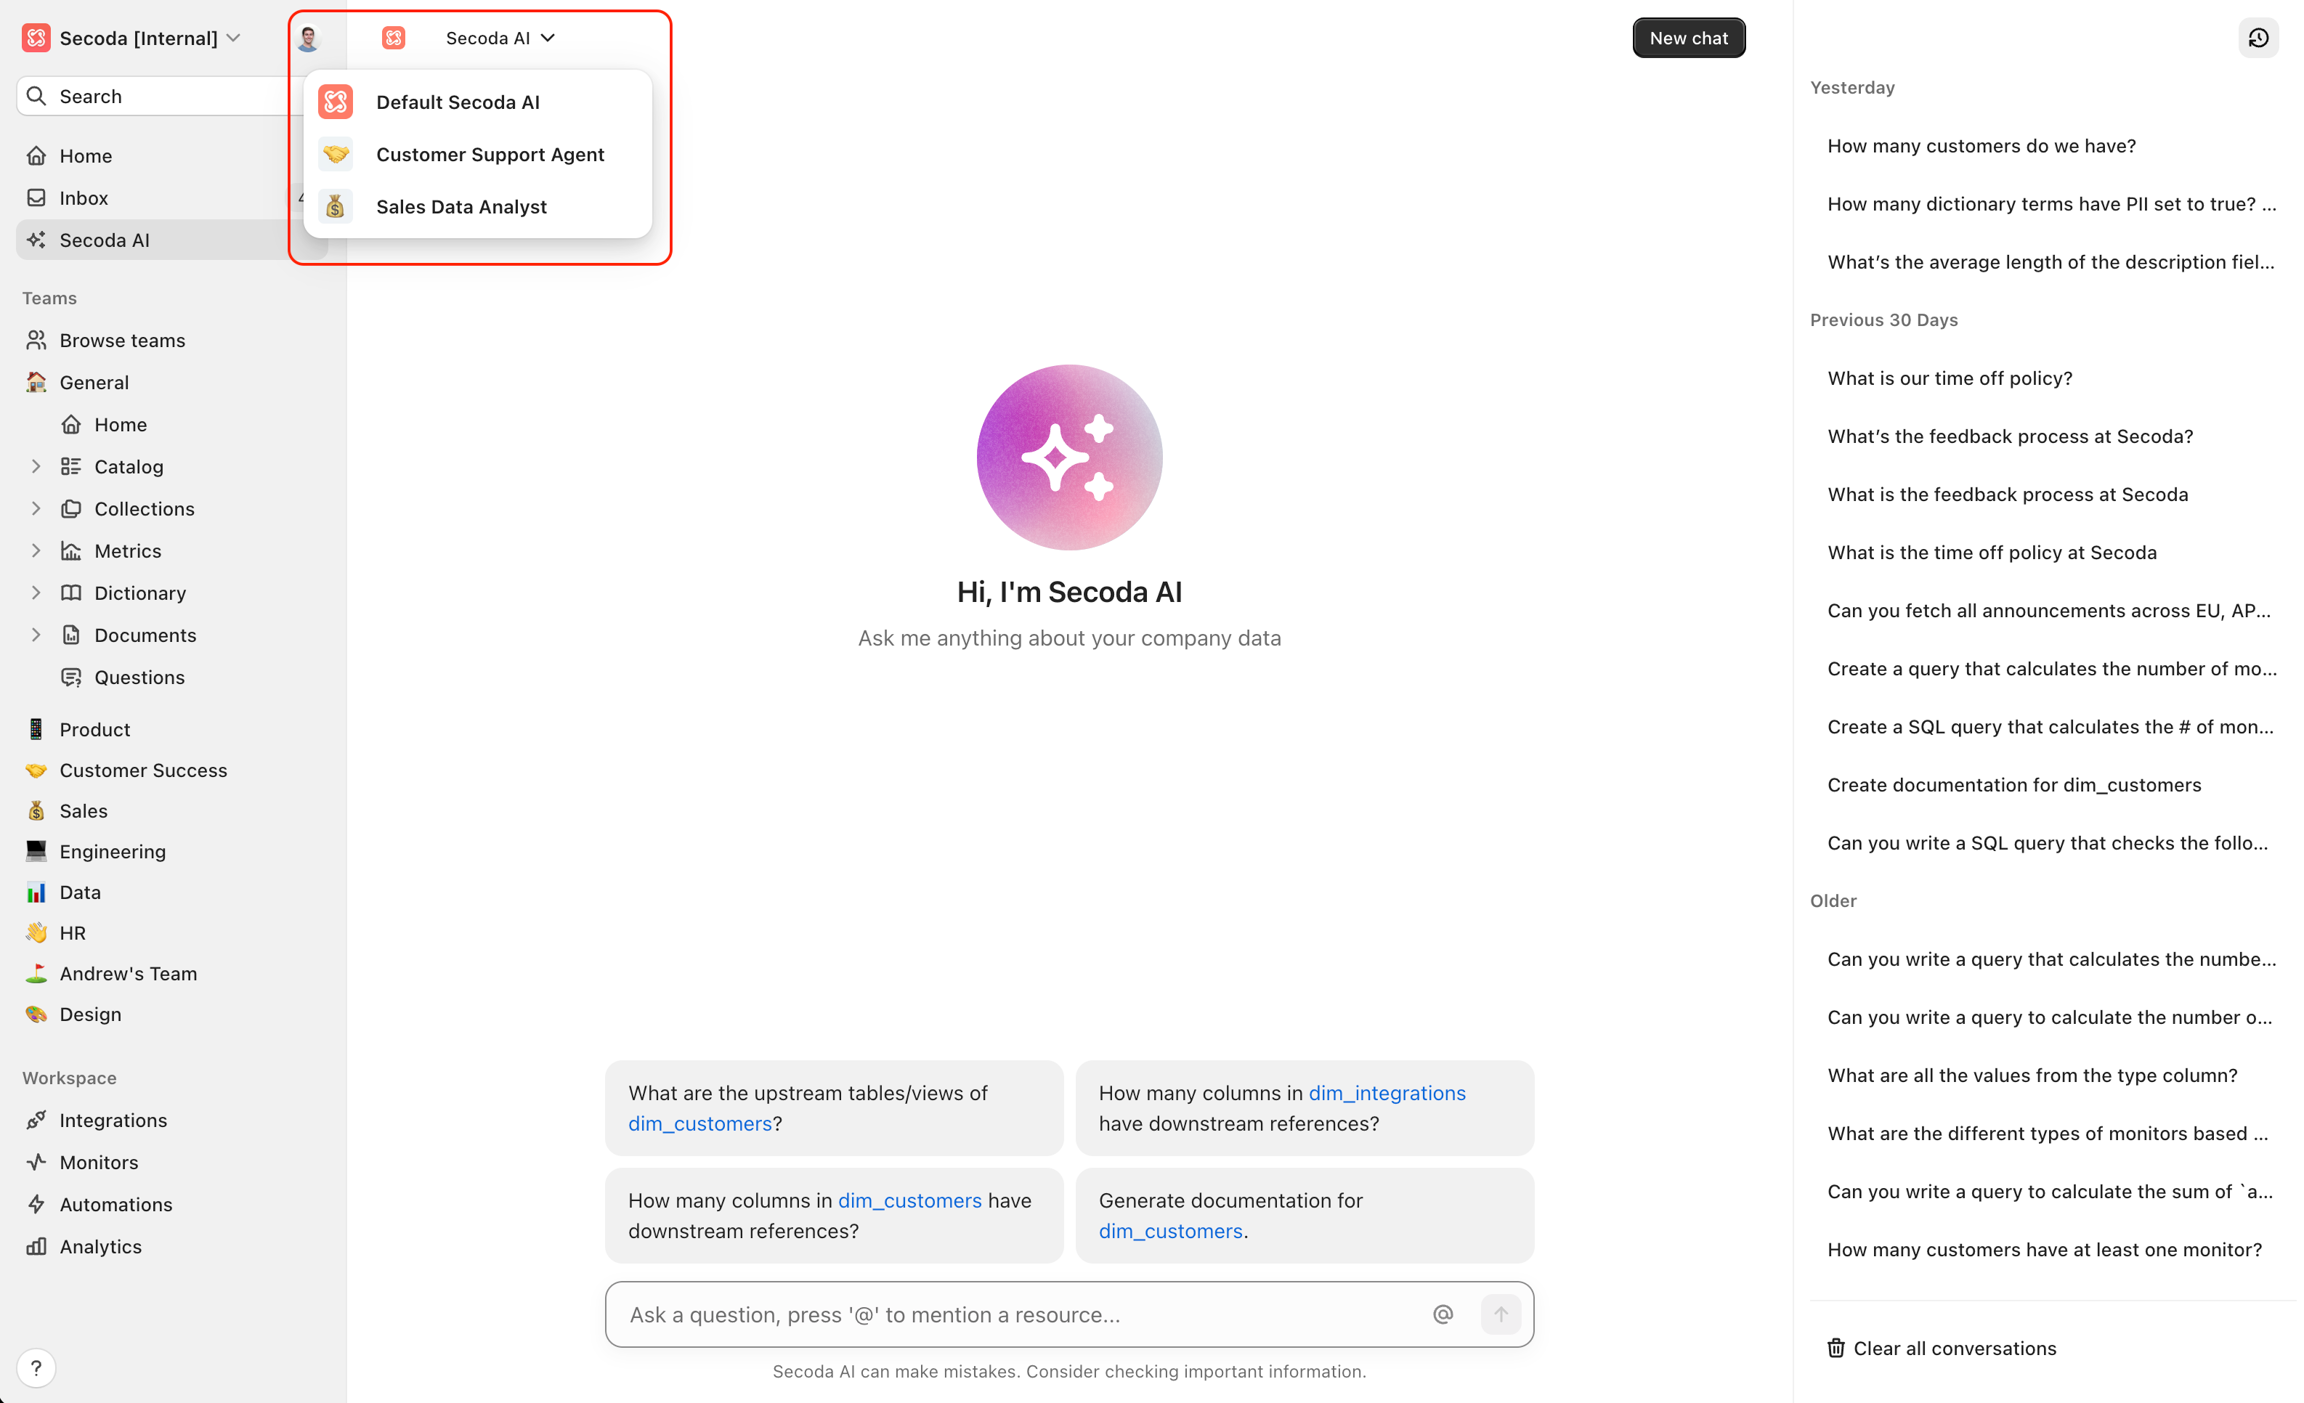
Secoda AI Personas are customizable assistants tailored to specific roles, aligning with team workflows. They access relevant data, support unique instructions, and integrate with tools like Slack. Personas can be personalized with names, icons, and permissions, ensuring the right people use the right tools for enhanced productivity.
Configuration
To create an AI Persona, open the AI settings and expand the "Personas" section and click the "Create Persona" button.
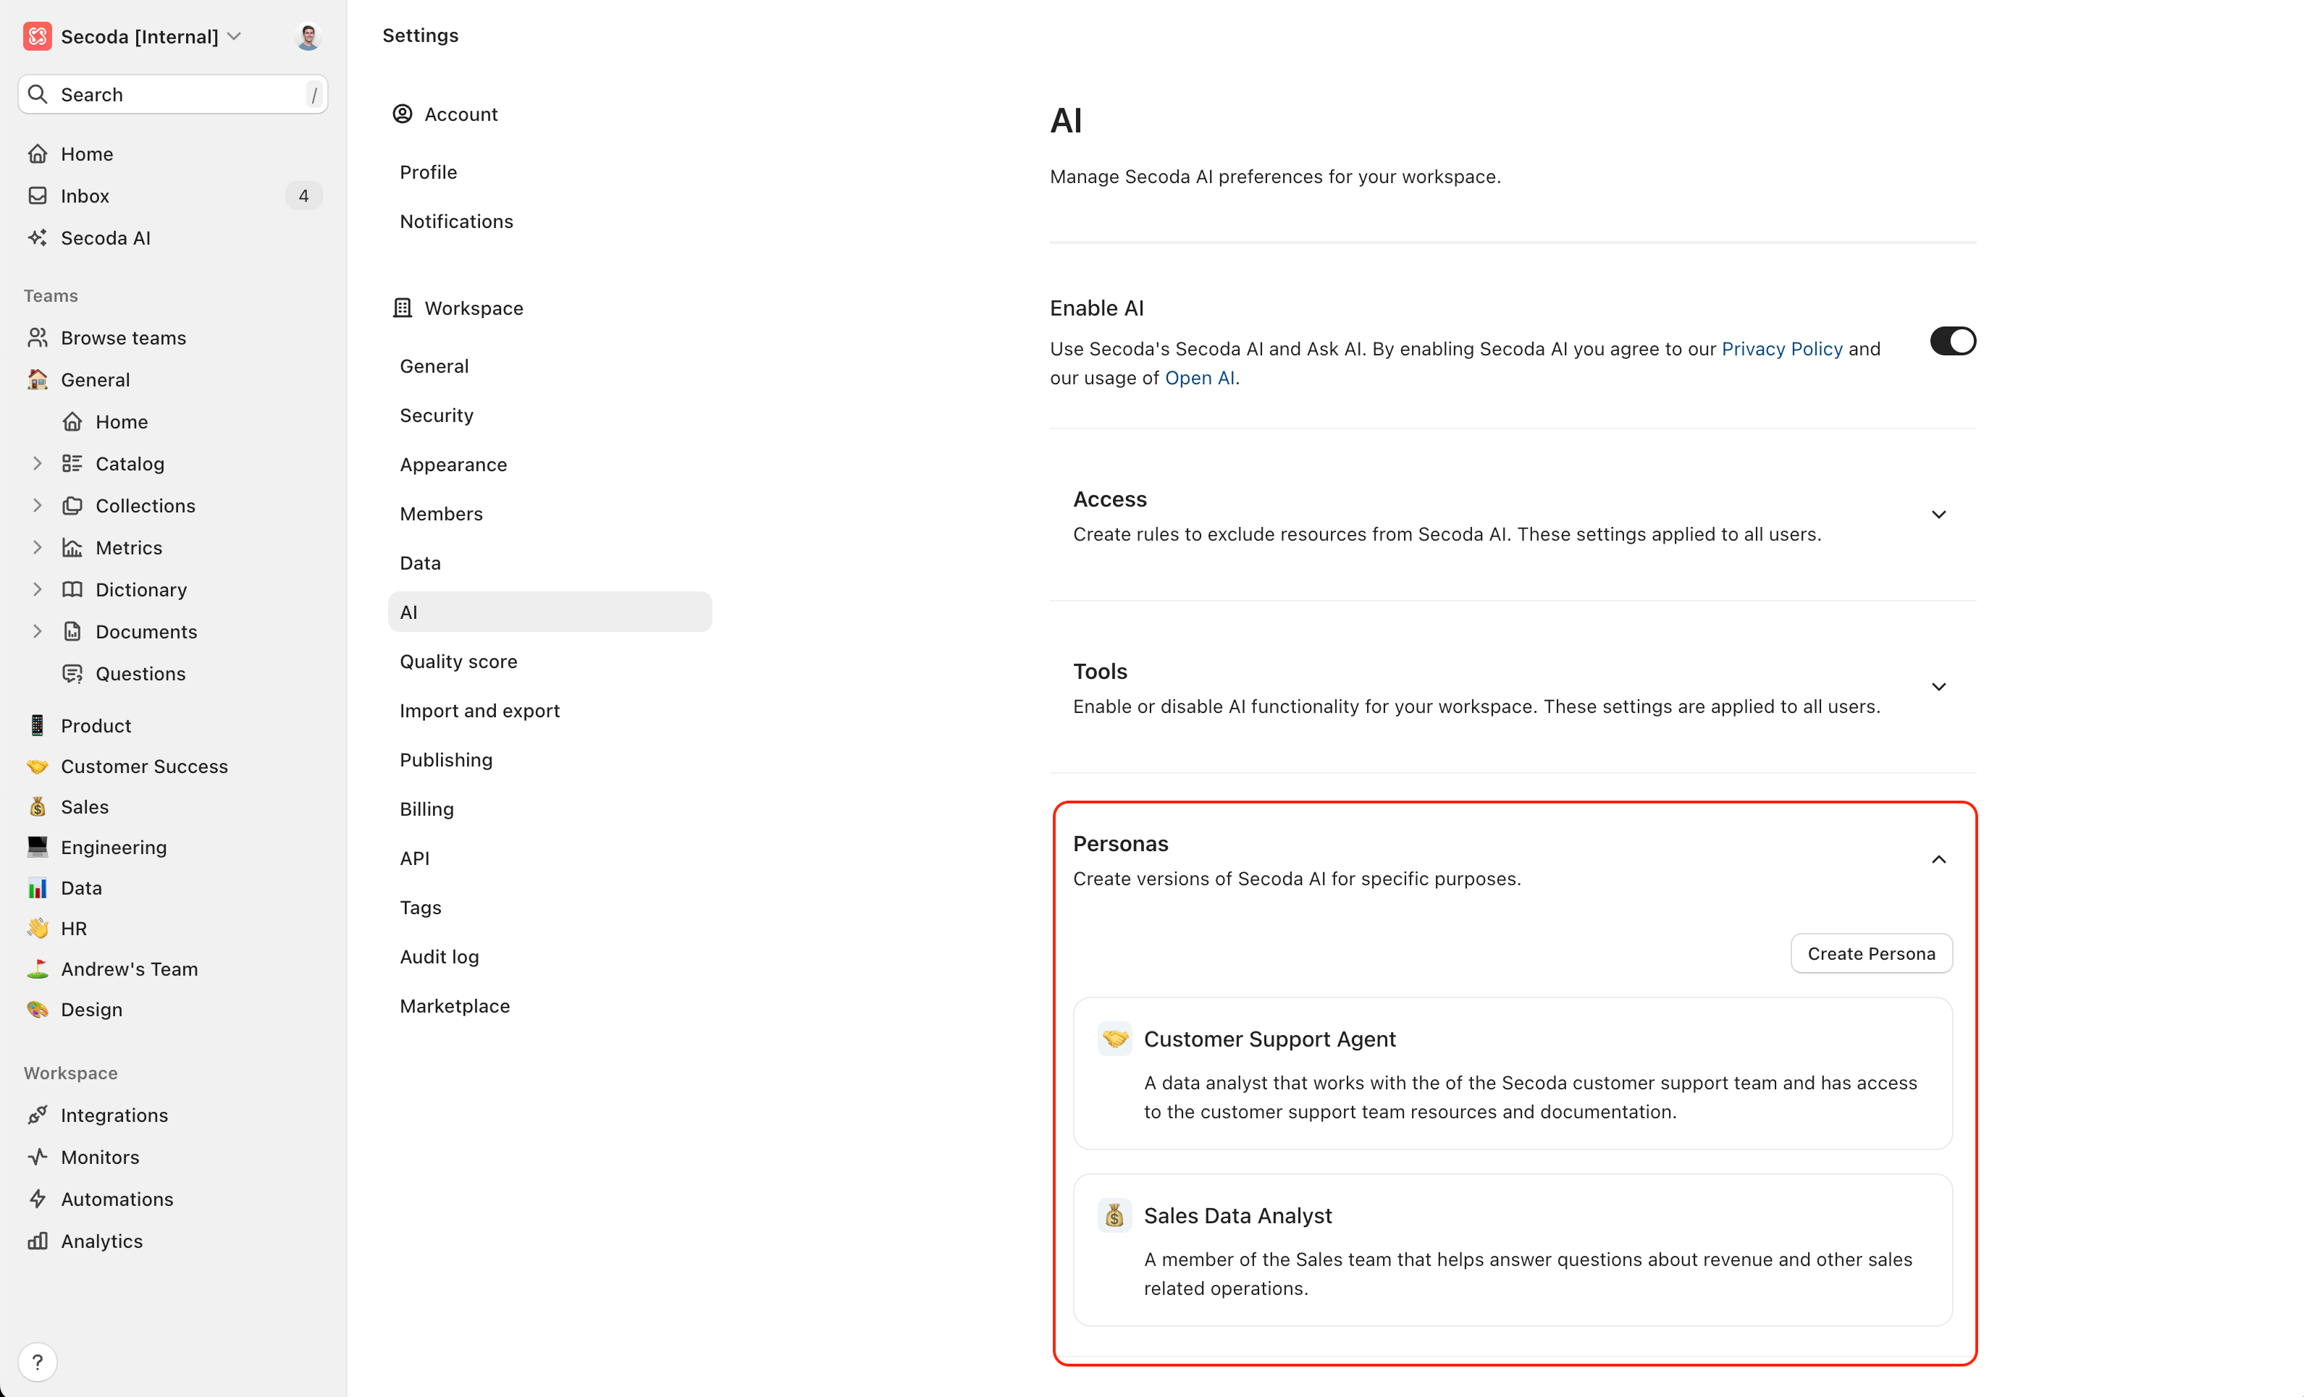
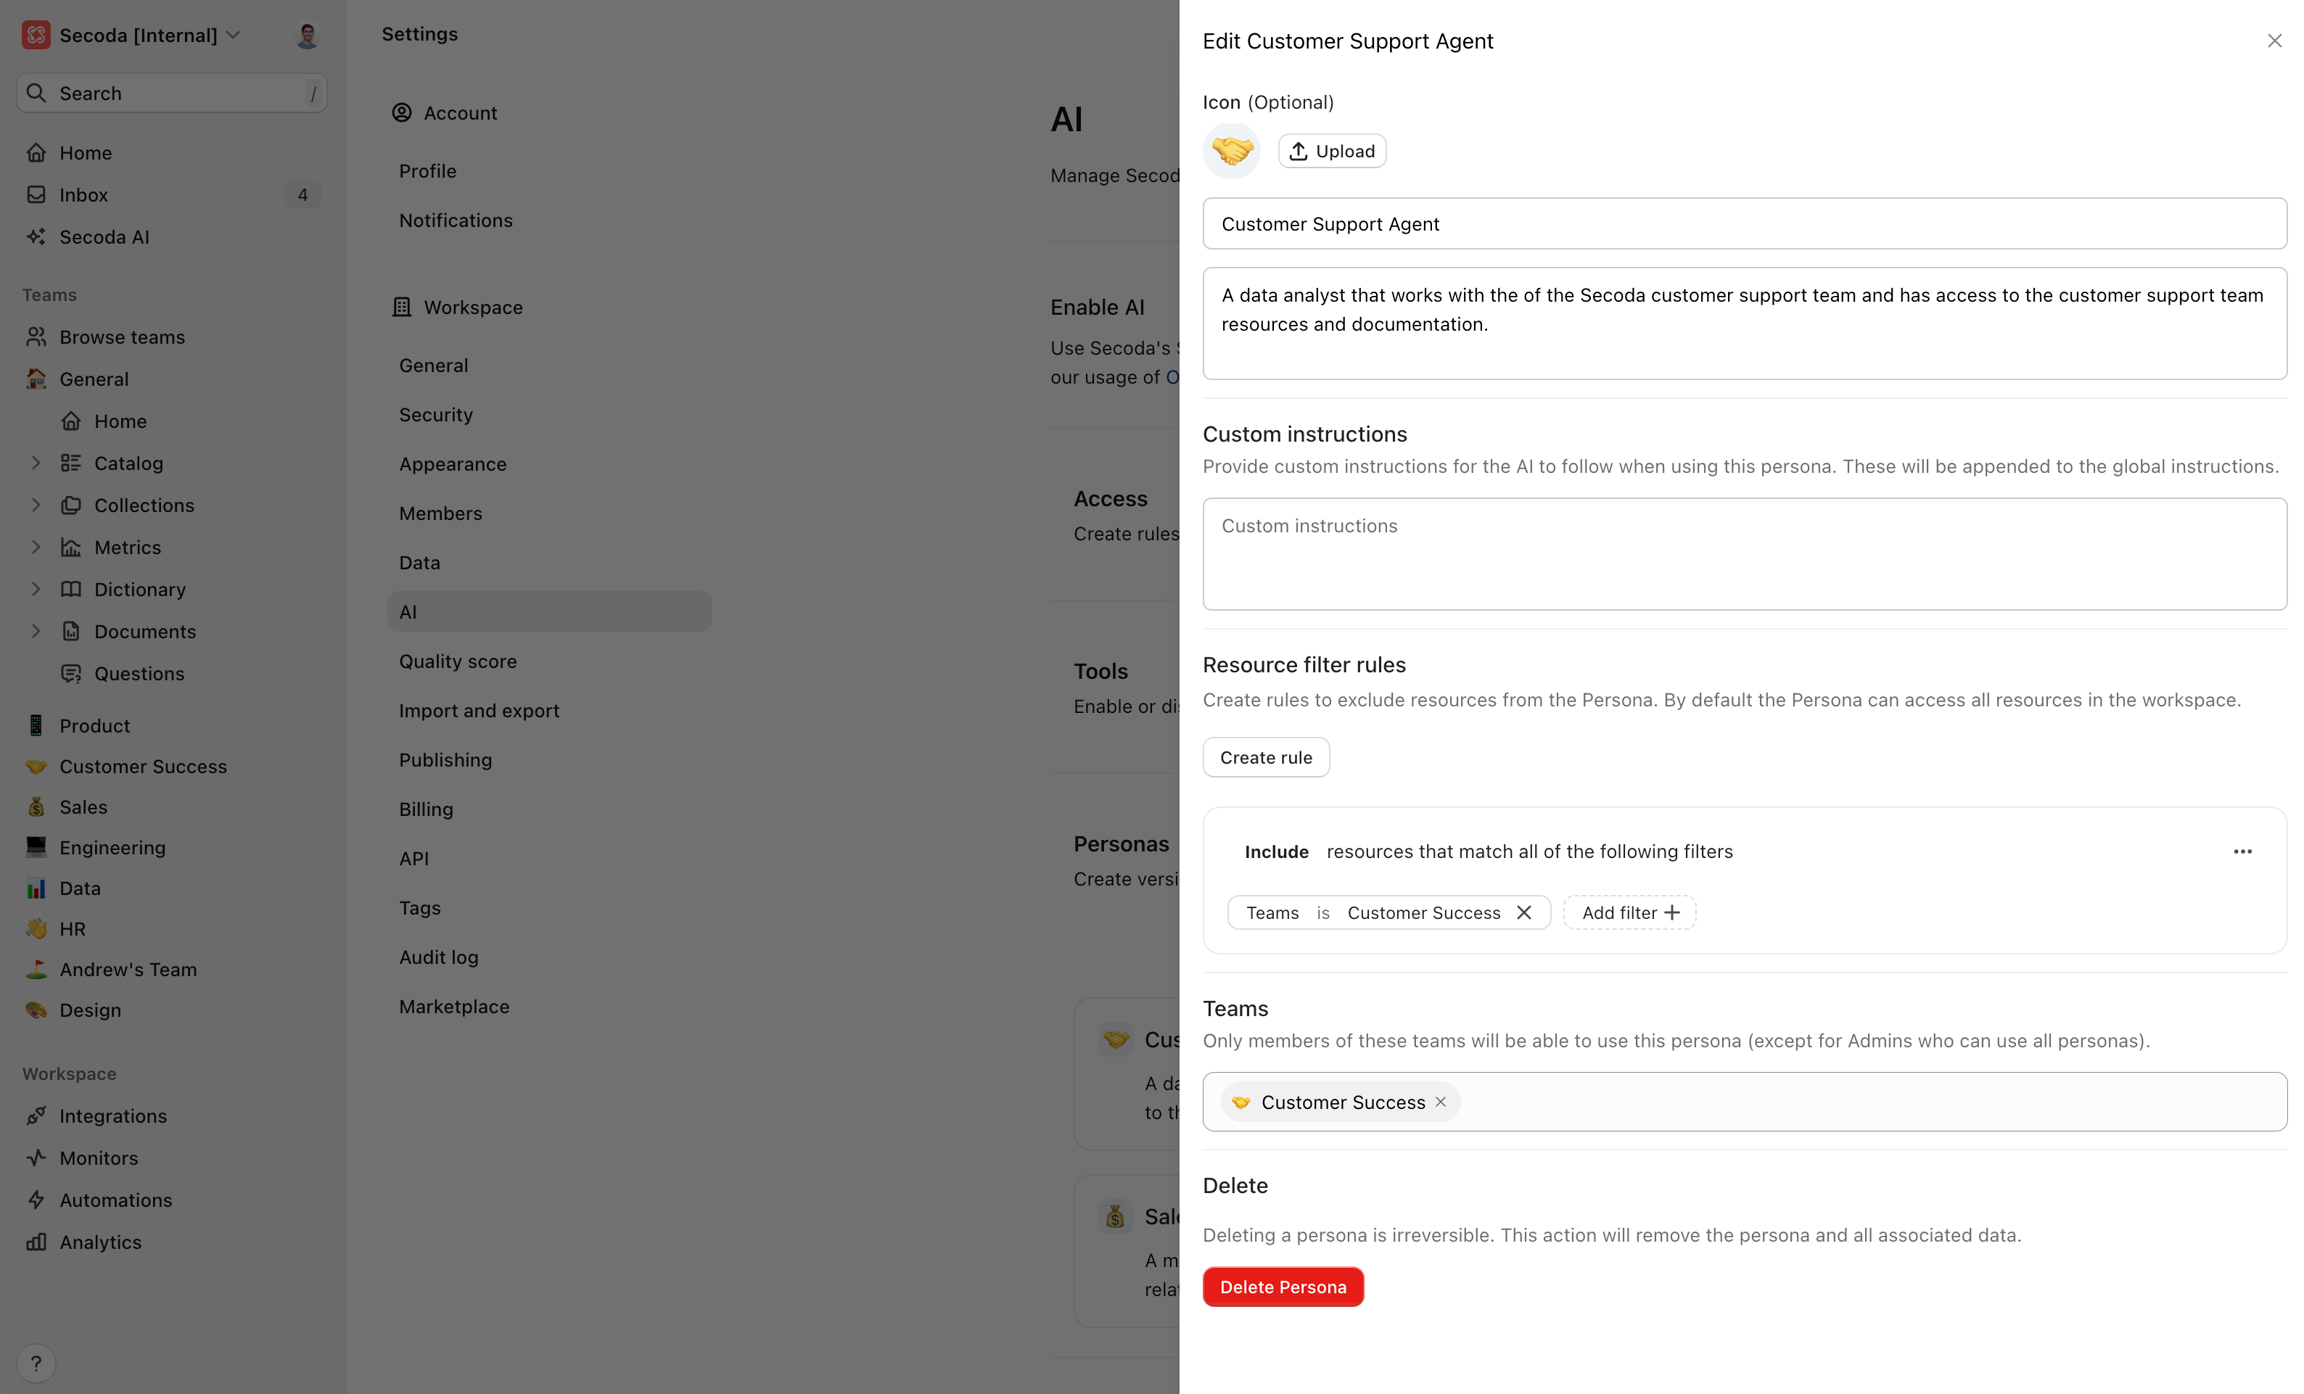
Each Persona can be configured with the following details:
Name: Give your Persona a unique name.
Icon: Select an icon that represents the Persona.
Description: Add a brief description of the Persona's purpose.
Custom Instructions: Set specific instructions for the Persona's role and tasks.
Resource Filters: Limit the Persona’s access to certain datasets or resources.
Team Access: Control which teams or users can access this Persona.
Once your Persona has been created, you can switch between Personas on the Secoda AI page. After that you can chat with your Secoda AI Persona similar to how you chat with Secoda AI.
Advanced Memory
Advanced Memory enables Secoda AI to learn from past interactions across the entire workspace, improving response quality and efficiency over time. Secoda AI analyzes past successful AI interactions to identify patterns and strategies that work well. This knowledge is then applied to future conversations to provide better assistance.
Key Features
Interaction Analysis: The system automatically analyzes completed AI interactions to identify:
Successful strategies: Tool sequences and reasoning approaches that led to correct solutions
Common pitfalls: Where the AI initially failed but later succeeded, noting breakthrough moments
Efficient workflows: Optimal tool usage patterns and data retrieval paths
Effective approaches: Information synthesis methods that produced good results
Knowledge Accumulation: The system builds a workspace-level knowledge base that includes:
Which tools work best for different query types
Effective error recovery strategies
Successful information synthesis approaches
Common dead ends to avoid
Automatic Learning: After each user-generated AI interaction, the system:
Analyzes the conversation for patterns and insights
Updates the workspace knowledge base with new learnings
Applies these insights to improve future interactions
Benefits
Enhanced Accuracy: By learning from past successes and failures, the AI becomes more accurate in similar future scenarios.
Improved Efficiency: The AI learns optimal tool sequences and approaches, reducing the number of steps needed to reach correct answers.
Workspace-Specific Intelligence: The knowledge base is tailored to your organization's specific data patterns, terminology, and common use cases.
Continuous Improvement: The system continuously learns and adapts, becoming more effective over time as it processes more interactions.
Sharing Chats
Workspace admins can view chats from Editors/Viewers without any permissions.
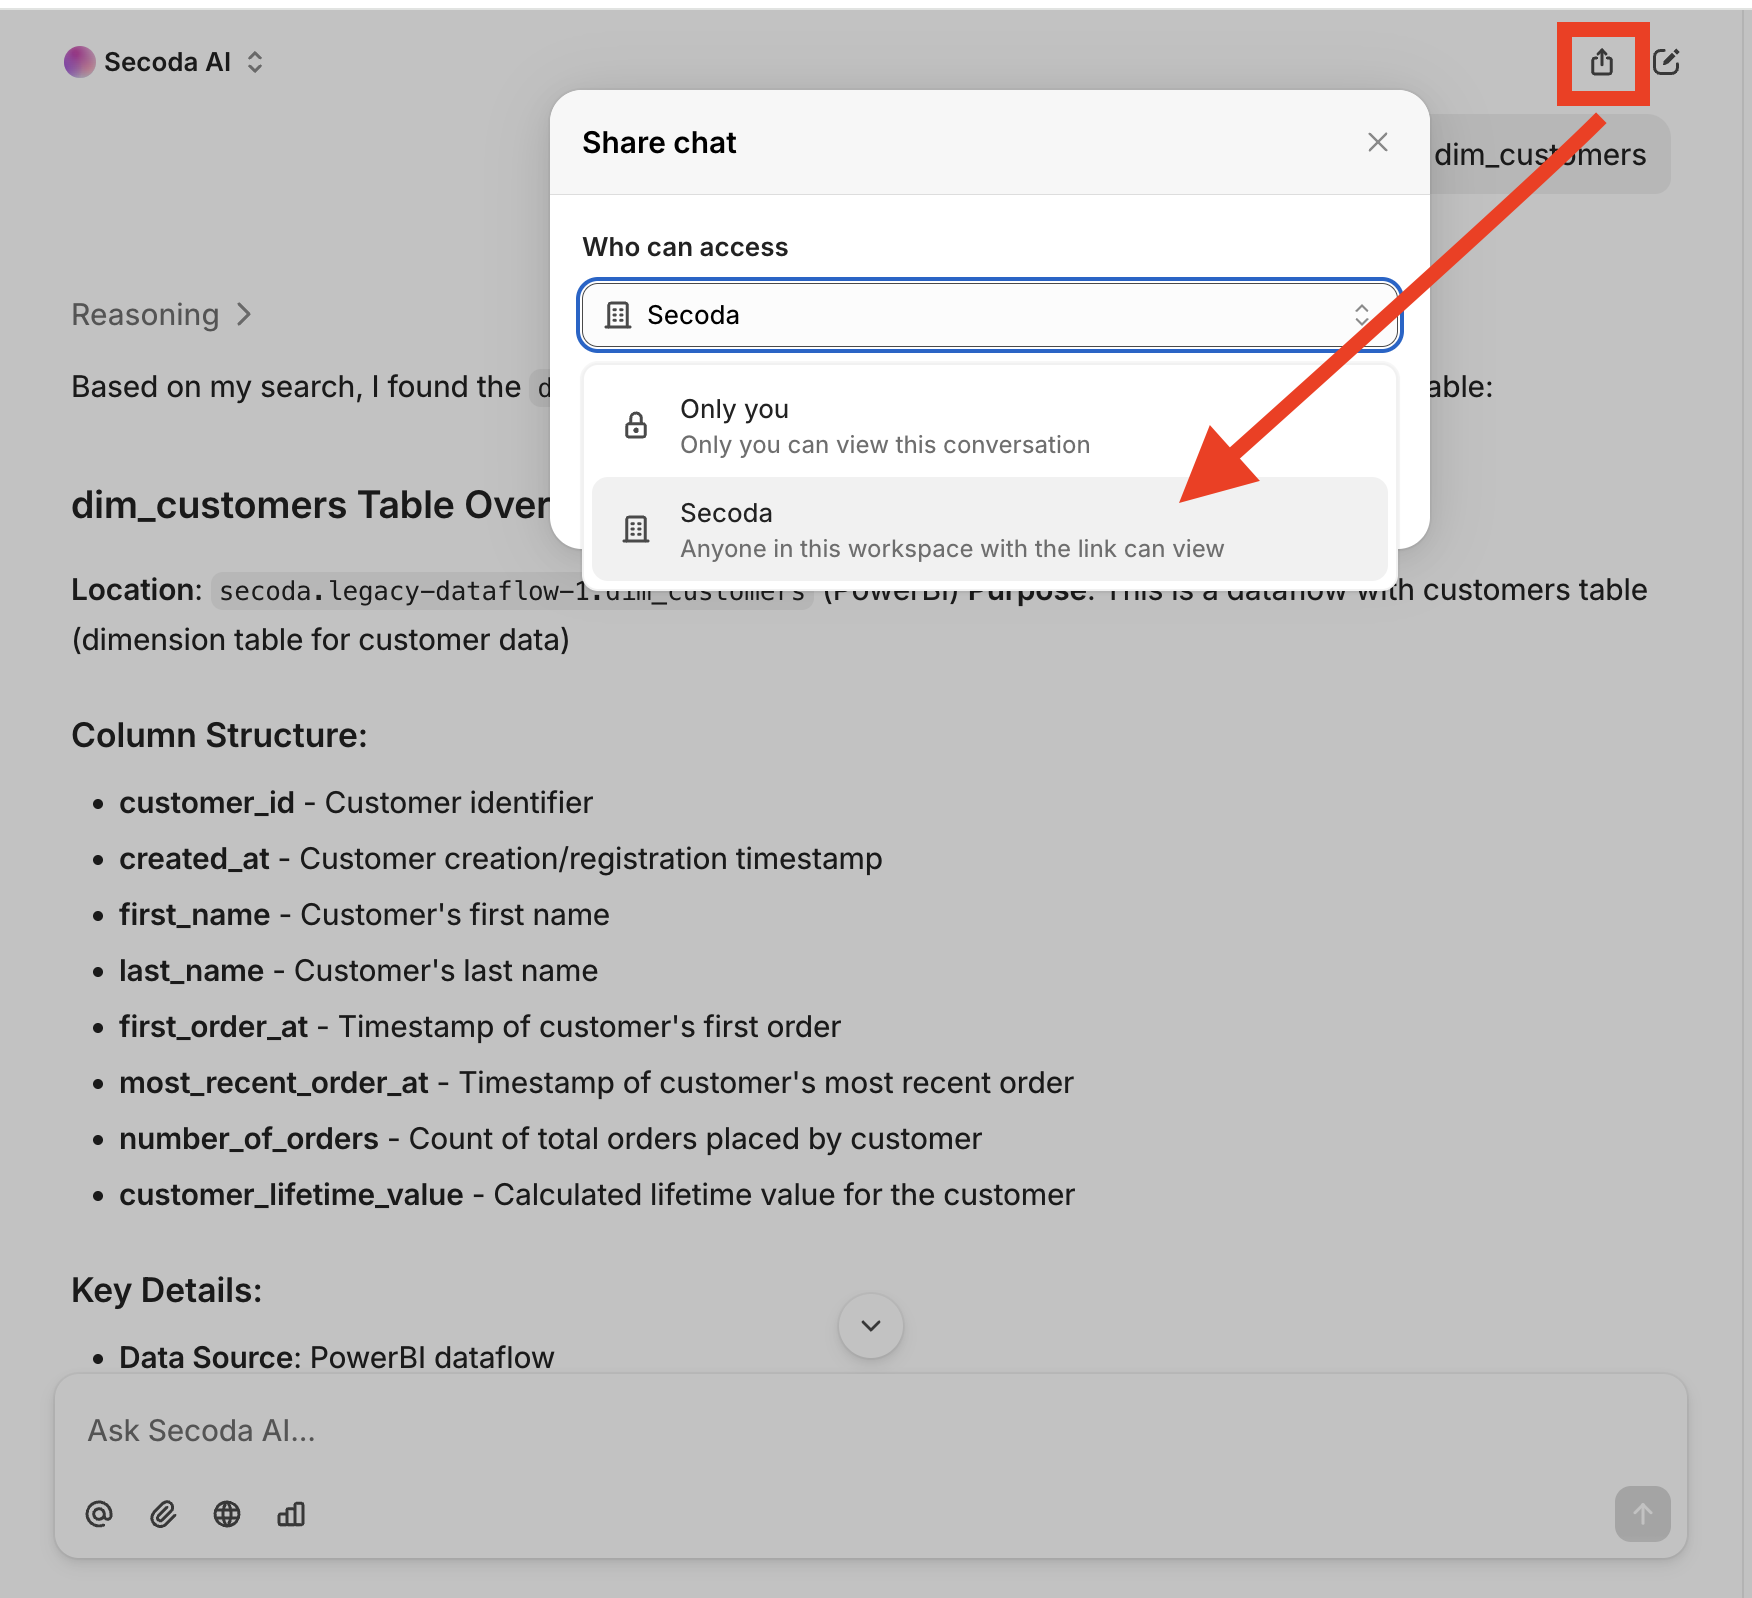
However, for Editors/Viewers to have access to the chats of other users, proper access needs to be granted. To grant access, click on the Share Chat button and extend access to the Secoda workspace to share your AI conversations with the team.
Additional documentation
User guideUse casesSecurity FAQsThis guide ensures that Admins are equipped to optimize the AI Assistant within their Secoda environment, driving efficient and secure data operations across the organization.
Secoda AI Assistant is only available for Version 7.0.0 and up.
Last updated
Was this helpful?